Desktop and Mobile Apps with Go using Fyne!
Even after years of coding for the web, I can’t let go of my love for desktop and terminal applications xD.
A long time ago, I spent a few days deciding which language would be best to dedicate myself to and master: Java or C#? The ideas I had in mind were exclusively focused on visual apps, with progress bars, real-time interface updates, and other things that were very popular at the time.
The funniest part was how quickly I hit a wall with a frozen interface when I needed to perform a process that took more than a few seconds xD
From there, I realized my life wouldn’t be easy and I had to study many concepts that veterans were already used to!

Why apps with a GUI?
It’s easy to notice that nowadays, many developers pay much more attention to web applications, such as APIs and interfaces with modern (and complex) frontends. I myself always forget the magical world of coding desktop applications. Then, every now and then, I remember apps like VSCode, OpenLens, proxies, and so many others, and I get nostalgic :smiley:
And Golang?
I’ve already written about wails here on the blog, which is a sensible choice for this domain of GUI apps. The only detail is the dependency on JS. If you’re comfortable with front-end technologies (React, Vue, Angular, etc.), Wails is excellent and will serve you well. I see Fyne as a simpler alternative that doesn’t tie you to other technologies, so depending on your situation, one or the other might be interesting.
What to code to get to know the “toolkit”?
Fyne uses this term to describe itself, “toolkit”, which means several tools are available to make the development cycle smoother.
The intro is excellent:
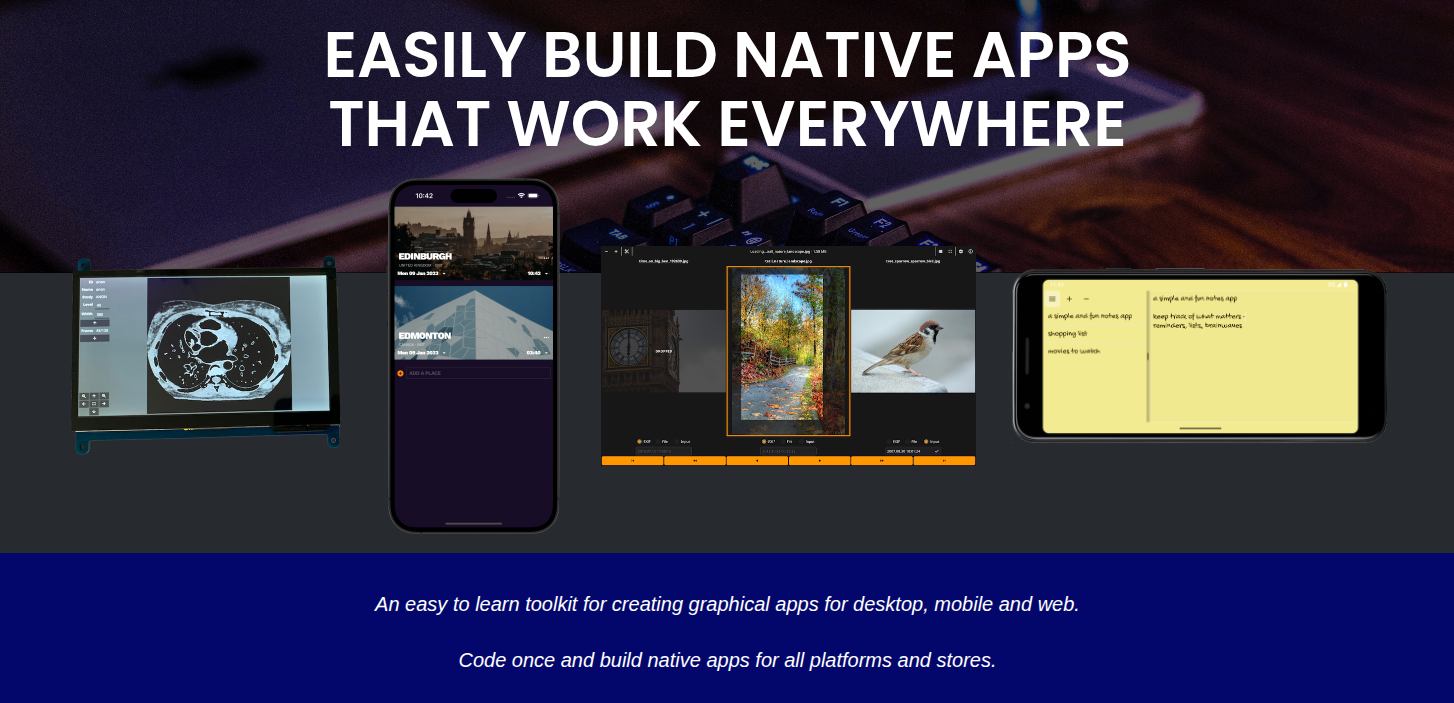
An easy to learn toolkit for creating graphical apps for desktop, mobile and web. Code once and build native apps for all platforms and stores.
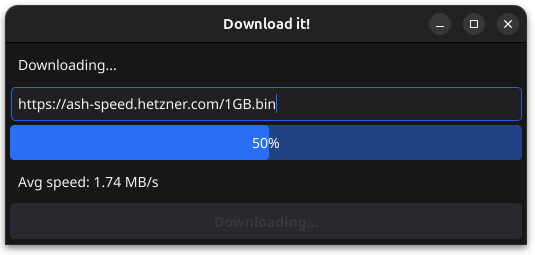
In this article, we’ll build a file “downloader”. A good use case to demonstrate things like: progress bar, file dialogs, interface updates, and even the use of libraries (to facilitate downloading and get information like download speed). The final result should look like this:
Project structure
For demonstration purposes, a very simple structure is enough:
.
├── cmd
│   └── godownloadit
│       ├── FyneApp.toml
│       ├── icon.png
│       └── main.go
├── go.mod
├── go.sum
As we go through the topics, we’ll get into the details.
Prerequisites
Before starting, we’ll need the following:
- golang >= 1.19
- a C compiler
- graphics driver
You can get all of this by following the getting started guide, which is simple.
The adventure begins
First, we need to initialize our project and add Fyne as a dependency.
Project bootstrap
$ mkdir downloadit
$ cd $_
$ go mod init github.com/girorme/downloadit <-- here use your github or another name that makes sense
Initialized the project? Now just add Fyne as a dependency:
$ go get fyne.io/fyne/v2@latest
$ go install fyne.io/tools/cmd/fyne@latest
How to organize the code?
The structure I used for the example considers the cmd/ folder as the entry point. We’ll leave our main.go file there.
Is it working for you?
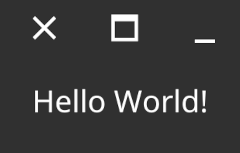
To validate the installation and understand the simplest possible structure of a Fyne app, we can test this code from the “first app” docs:
package main

import (
    "fyne.io/fyne/v2/app"
    "fyne.io/fyne/v2/widget"
)

func main() {
    a := app.New()
    w := a.NewWindow("Hello World")

    w.SetContent(widget.NewLabel("Hello World!"))
    w.ShowAndRun()
}
To run the application:
$ go run cmd/downloadit/main.go
output:
Usually, a Fyne application like the one in the code above can be represented as follows:
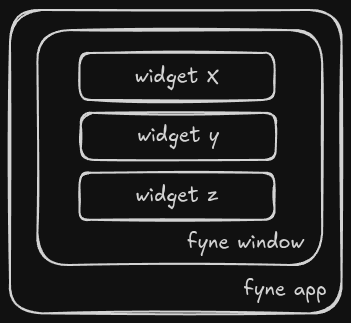
- Main app
- One or more windows within the app
- Widgets inside the windows
- One or more windows within the app
Composing the application
This is an example you could probably do in other ways; I followed a simple organization that allows us to update and perform actions more easily. Let’s go piece by piece:
package main

import (
    "fmt"

    "fyne.io/fyne/v2"
    "fyne.io/fyne/v2/app"
    "fyne.io/fyne/v2/container"
    "fyne.io/fyne/v2/dialog"
    "fyne.io/fyne/v2/widget"
    "github.com/melbahja/got"
)

var (
    DEFAULT_SIZE                 = fyne.NewSize(520, 175)
    OPENING_FILE_SIZE            = fyne.NewSize(620, 504)
    APP_LABEL                    = "Download it!"
    DEFAULT_DOWNLOAD_SPEED_LABEL = "Avg speed: 0"
    DOWNLOADING_LABEL            = "Downloading..."
)

type DownloadIt struct {
    app                fyne.App
    window             fyne.Window
    mainTitle          *widget.Label
    urlEntry           *widget.Entry
    pBar               *widget.ProgressBar
    downloadBtn        *widget.Button
    downloadSpeedLabel *widget.Label
}
Like any other application, when working with GUIs, sooner or later we reuse values. I left some constants for this purpose in lines 14~20.
Below, I created a struct to simplify access to our application’s components, so we don’t have to keep passing components as arguments to functions all the time, reducing complexity:
type DownloadIt struct {
    app                fyne.App
    window             fyne.Window
    mainTitle          *widget.Label
    urlEntry           *widget.Entry
    pBar               *widget.ProgressBar
    downloadBtn        *widget.Button
    downloadSpeedLabel *widget.Label
}
A brief explanation of why each component is used:
app - fyne.App- The core of our application and where we attach new components (represented in the previous diagram)window - fyne.Window- In this window, we’ll place our widgets. Here, as in other languages/frameworks, we can define the window size, behaviors, and eventsmainTitle - *widget.Label- Labels in Fyne are used for text, a simple way for strings that can be updated according to the current operationurlEntry - *widget.Entry- Here, making an analogy to the web, this would be our text input, where we’ll set the file to be downloadedpBar - *widget.ProgressBar- ProgressBar that we’ll use to track the download processdownloadBtn - *widget.Button- Buttons are buttons xD, through them we can emit events, and in this one, we’ll start our download and update some statesdownloadSpeedLabel - *widget.Label- This label will be updated in real time with the current download speed
Component skeleton
The main() function in this application will serve as the entry point for setup and running the app:
func main() {
    app := NewApp()

    app.setupContent()
    app.run()
}
As a good practice in Go applications, it’s recommended and works very well to have a function that initializes our struct, here we’ll do it through the NewApp() function:
func NewApp() *DownloadIt {
    app := app.New()
    window := app.NewWindow(APP_LABEL)
    mainTitle := widget.NewLabel(APP_LABEL)
    urlEntry := widget.NewEntry()
    urlEntry.SetPlaceHolder("Enter URL...")

    pBar := widget.NewProgressBar()
    pBar.Max = 99.99

    downloadSpeedLabel := widget.NewLabel(
        DEFAULT_DOWNLOAD_SPEED_LABEL
    )

    return &DownloadIt{
        app:                app,
        window:             window,
        mainTitle:          mainTitle,
        urlEntry:           urlEntry,
        pBar:               pBar,
        downloadSpeedLabel: downloadSpeedLabel,
    }
}
Here we create our first composition:
- We create a new
fyne.Appthrough theapp.New()function - Attach a window to this app with
app.NewWindow(APP_LABEL), using the constant defined earlier - Create the components to be used and set some values/properties:
- Labels with the text we need
- Entry and add a placeholder
- ProgressBar and set the maximum value
In the end, we return the struct reference.
Once the components are established, let’s organize them in the layout and also add the necessary behaviors for each to work as expected.
Component setup
Now that we have the struct with the available components, let’s create methods for this struct. Starting with setupContent():
func (app *DownloadIt) setupContent() {
    app.resizeWindow(DEFAULT_SIZE)
    app.setupDownload()
    app.window.SetContent(container.NewVBox(
        app.mainTitle,
        app.urlEntry,
        app.pBar,
        app.downloadSpeedLabel,
        app.downloadBtn,
    ))
}
The default window behavior in Fyne is to grow as components are added. To create a predefined size, we’ll use the app.resizeWindow() function:
func (app *DownloadIt) resizeWindow(size fyne.Size) {
    app.window.Resize(fyne.NewSize(size.Width, size.Height))
}
- To make it easier to change the size when needed!
Download logic
Here we create the button and associate a click event function:
func (app *DownloadIt) setupDownload() {
    app.downloadBtn = widget.NewButton("Download", func() {
        app.downloadFile()
    })
}
Here we populate our struct with the download button defined earlier. We associate the string “Download” with it. Going one level deeper, let’s look at the app.downloadFile() function, which is the main one in the program. Here, basically, the most interesting things happen:
func (app *DownloadIt) downloadFile() {
    if app.urlEntry.Text == "" {
        dialog.ShowInformation(
            "URL required",
            "Please enter a valid URL to download.",
            app.window
        )
        return
    }

    app.updateStartAndFinishedState(true)
    app.resizeWindow(OPENING_FILE_SIZE)

    dialog.ShowFileSave(
        func(writer fyne.URIWriteCloser, err error)
    {
        defer app.resizeWindow(DEFAULT_SIZE)

        if err != nil || writer == nil {
            app.mainTitle.SetText(APP_LABEL)
            return
        }
        defer writer.Close()

        fileToSave := writer.URI().Path()
        fmt.Printf(
            "File to save: %s - %s\n",
            app.urlEntry.Text,
            fileToSave
        )

        downloadSpeedStr := DEFAULT_DOWNLOAD_SPEED_LABEL

        go func() {
            g := got.New()
            g.ProgressFunc = func(d *got.Download) {
                progress :=
                    float64(d.Size()) /
                    float64(d.TotalSize()) * 100
                fyne.Do(func() {

                    if d.Speed() > 0 {
                        downloadSpeedStr = fmt.Sprintf(
                            "Avg speed: %s",
                            formatDownloadSpeed(d.Speed())
                        )
                    }

                    app.pBar.SetValue(progress)
                    app.downloadSpeedLabel.SetText(
                        downloadSpeedStr
                    )
                })
            }

            err := g.Download(app.urlEntry.Text, fileToSave)
            if err != nil {
                dialog.ShowError(
                    fmt.Errorf(
                        "error downloading file: %s",
                        err
                    ),

                    app.window
                )
                app.updateStartAndFinishedState(false)
                return
            }

            app.updateStartAndFinishedState(false)
        }()
    }, app.window)
}
Let’s break it down so it’s not overwhelming:
Download URL validation
if app.urlEntry.Text == "" {
    dialog.ShowInformation(
        "URL required",
        "Please enter a valid URL to download.",
        app.window
    )
    return
}
Our program has a URL input; if it’s empty, we use the dialog.ShowInformation() function to display a message box.
Notice here the benefit of having the program structured through a struct for component access. We have access to everything! See that we pass
app.window()to the message box function in a very simplified way!!!
State update at the start and end of the download operation
The app.updateStartAndFinishedState(bool) function that follows is a “helper” to update some strings and behaviors when we start and finish a download. This practice helps you perform repetitive tasks where you need to update multiple components at a certain moment:
func (app *DownloadIt) updateStartAndFinishedState(
    starting bool
) {
    if starting {
        app.mainTitle.SetText(DOWNLOADING_LABEL)
        app.updateDownloadBtnText(DOWNLOADING_LABEL, true)
        return
    }

    app.mainTitle.SetText(APP_LABEL)
    dialog.ShowInformation(
        "Download completed",
        "File downloaded successfully!",
        app.window
    )
    app.updateDownloadBtnText("Download", false)
    app.pBar.SetValue(0.0)
    app.downloadSpeedLabel.SetText(
        DEFAULT_DOWNLOAD_SPEED_LABEL
    )
}
Here we have things we’ve seen before except for a new way to update components, which is present in the updateStartAndFinishedState(bool) function:
func (app *DownloadIt) updateDownloadBtnText(
    text string,
    disable bool
) {
    fyne.Do(func() {
        app.downloadBtn.SetText(text)

        if disable {
            app.downloadBtn.Disable()
            return
        }

        app.downloadBtn.Enable()
    })
}
This function is called at a point in our program where the operation will be inside a goroutine, so here the use of fyne.Do() is necessary. It will ensure our UI is updated correctly. Here is a very nice explanation generated with an LLM:
“Think of the graphical interface as a theater stage. Only one actor can be on stage at a time (the main thread of the application). The helpers working backstage (the goroutines) can’t just barge onto the stage and mess with the scenery (the widgets), because that would cause confusion and could break the play (errors and concurrency). Instead, they hand a note to the stage manager (fyne.Do). This manager ensures that changes are made at the right time and in an organized way, keeping the show running smoothly.”
I used the disable flag in this function to know when we’re downloading and need to block the button, so we avoid the user clicking more than once. Simple and clever, right? xD
Changing the window size
We change the window size once during the app setup. We’ll need to change it again now. The reason: We’ll open a “File dialog” to select the destination of our download. To make the new window a suitable size, showing folders and other files, we’ll do this resize.
Showing the “File Dialog”
Everything inside dialog.ShowFileSave() happens as soon as the file selection window appears and we select a file or cancel the operation. This function gives us two parameters:
writer fyne.URIWriteCloser- Here, a handler pointing to the file selected by the user; with this writer, we actually send the data into the fileerr error- Indicates if there was a problem creating/overwriting the file
Right away, we can validate in case of error/cancellation:
defer app.resizeWindow(DEFAULT_SIZE)

if err != nil || writer == nil {
    app.mainTitle.SetText(APP_LABEL)
    return
}
defer writer.Close()
In this case, we return the window to its default size and set the text for when there is no download in progress. And writer.Close() closes the file handle at the end of the function.
Starting the download and getting information about the file being downloaded
From now on, we set the download speed label (default always 0 (zero)) and also update the label as the speed varies:
downloadSpeedStr := DEFAULT_DOWNLOAD_SPEED_LABEL

go func() {
    g := got.New()
    g.ProgressFunc = func(d *got.Download) {
        progress :=
            float64(d.Size()) /
            float64(d.TotalSize()) * 100
        fyne.Do(func() {

            if d.Speed() > 0 {
                downloadSpeedStr = fmt.Sprintf(
                    "Avg speed: %s",
                    formatDownloadSpeed(d.Speed())
                )
            }

            app.pBar.SetValue(progress)
            app.downloadSpeedLabel.SetText(
                downloadSpeedStr
            )
        })
    }

    ...
Details:
g := got.New()- Here we’re using the Got library, which allows us to easily download files. You can use Got as a program or module. Here it was installed as follows:- go get github.com/melbahja/got/cmd/got@latest
Continuing the code, we use the callback the library gives us to track the download progress, so we can update our progress bar and display the download speed:
g.ProgressFunc = func(d *got.Download) {
    progress :=
        float64(d.Size()) /
        float64(d.TotalSize()) * 100
    fyne.Do(func() {

        if d.Speed() > 0 {
            downloadSpeedStr = fmt.Sprintf(
                "Avg speed: %s",
                formatDownloadSpeed(d.Speed())
            )
        }

        app.pBar.SetValue(progress)
        app.downloadSpeedLabel.SetText(
            downloadSpeedStr
        )
    })
}
The important thing to mention again is the use of the fyne.Do() function, which allows us to update the GUI without errors.
Run
If everything is correct, the command:
$ go run cmd/godownloadit/main.go
Should show the final interface of the program :)
To test, you can use the test files at this URL: https://ash-speed.hetzner.com/.
Repo link with final code:
Considerations
With Fyne, you can create mobile, desktop, and web apps without depending on other frameworks like JS! With a simple and intuitive API, there’s no secret for UI updates or tasks that will be long and concurrent, just use it :)